Drill Pipe Information
Drill Pipe Information
Drill pipe is hollow, thick-walled piping that transmits drilling fluid and torque through the wellbore to the drill bit on a drilling rig. It is manufactured to withstand severe internal and external pressure, distortion, bending, and vibration as it both rotates and lifts the bottom hole assembly (BHA). Drill pipe is threaded on each end in a section of pipe referred to as the tool joint. It is manufactured, sampled, tested, and inspected in accordance with standard specifications such as the American Petroleum Institute (API).
Types of Drill Pipe
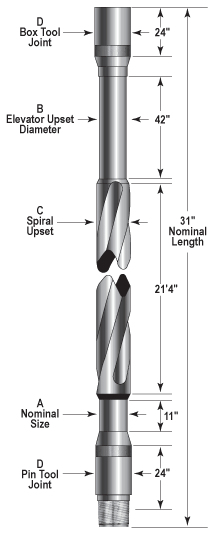
Standard drill pipes are long tubular sections of pipe that make up the majority of the drill string. They are typically a 31 foot long section of tubular pipe but may be anywhere from 18 to 45 feet in length.
Heavy weight drill pipe (HWDP) is a tubular pipe that adds weight or acts as a transitional piece in the drill string. As a transitional section of the drill string, it is placed between the drill collar and standard drill pipe to reduce fatigue failures. In other applications the HWDP is used as an additional weight to weigh down the drill string.
Drill collars are a component of the drill string that makes up part of the BHA. They are thicker-walled, heavier, and more rigid than drill pipes and are primarily used to weigh down the drill bit while dampening vibration and impact forces.
Drill Pipe Grades
Drill pipe grades include standard API grades (E-75, X-95, G-105, & S-135), as well as proprietary grades.
API Grade Drill Pipe
API SPEC 5DP specifies the technical delivery conditions for steel drill-pipes with upset pipe-body ends and weld-on tool joints for use in drilling and production operations in petroleum and natural gas industries for three product specification levels (PSL-1, PSL-2 and PSL-3). PS-1 specifies wall thickness, impact strength, and yield strength requirements specific to the material grade. Specification levels PL-2 / PL-3 have additional mandatory requirements.
| API Drill Pipe Grade | Minimum Yield Strength (psi) | Minimum Tensile Strength (psi) |
| E-75 | 75,000 | 100,000 |
| X-95 | 95,000 | 105,000 |
| G-105 | 105,000 | 115,000 |
| S-135 | 135,000 | 145,000 |
Grade E drill pipe, referred to as "mild" steel, exhibits the lowest yield strength per unit area with a yield strength of less than 80,000 psi. It is able to withstand a greater percentage of stretch or "strain" prior to fracture than higher strength drill pipe grades. It is also more resistant to corrosion and cracking. Grade E is utilized in medium depth wells from 10,000 to 15,000 feet.
Grades X-95, G-105, and S-135 are considered high strength grades. They exhibit increased yield strength which is required to service deeper wells.
Proprietary Grades
Proprietary grades often exceed the specifications set forth by API SPEC 5DP. Their enhanced performance properties are developed for sour service, critical service, and other user-defined requirements.
Sour service grades resist sulphide stress corrosion (SSC). SSC can occur when hydrogen sulfide is present. Ingress of hydrogen coupled with higher stresses, low temperatures, low pH, and high chloride content decreases the ductility of steel grades leaving them susceptible to crack propagation and failure.
Critical service grades resist corrosion when sweet gas or high concentrations of carbon dioxide are present. They are a cost effective alternative that is used in water injection applications.
Sizing
Drill pipe is manufactured according to standard specifications and is offered in nominal sizes. The two most important dimensional specifications are length and diameter.
Length
The drill string is made up of several sections of drill pipe. The term "stand" refers to two or three sections of drill pipe that are fed into the well bore to complete 60 to 90 feet of drilling. Each segment of pipe, referred to as a "single", is classified by API into three distinct length ranges; R1, R2, and R3.
Range 1 (R1) is shortest in length, more common for sizing production tubing or casing, and ranges from 18 to 22 ft.
Range 2 (R2) is considered the standard length for drill pipe and ranges from 27 to 31 ft.
Range 3 (R3) is common in casing and also deployed in deep water drilling applications. The increased length decreases the number of tool joints in each stand of drill pipe. The fall back being that the load exerted on each tool joint is greater increasing wear and reducing the expected life of the drill pipe. R3 ranges from 38 to 45 ft.
Diameter
The outer diameter (OD) of the drill pipe is offered in nominal sizes ranging from 2 3/8" to 6 5/8". The diameter of pipe is selected based on the borehole diameter. In order to effectively circulate drilling mud and minimize pressure losses, the ratio of drill pipe outside diameter to borehole diameter should be about 0.6.
Tool Joint
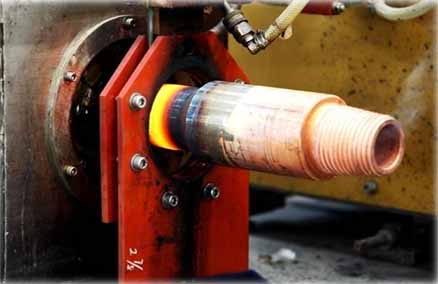
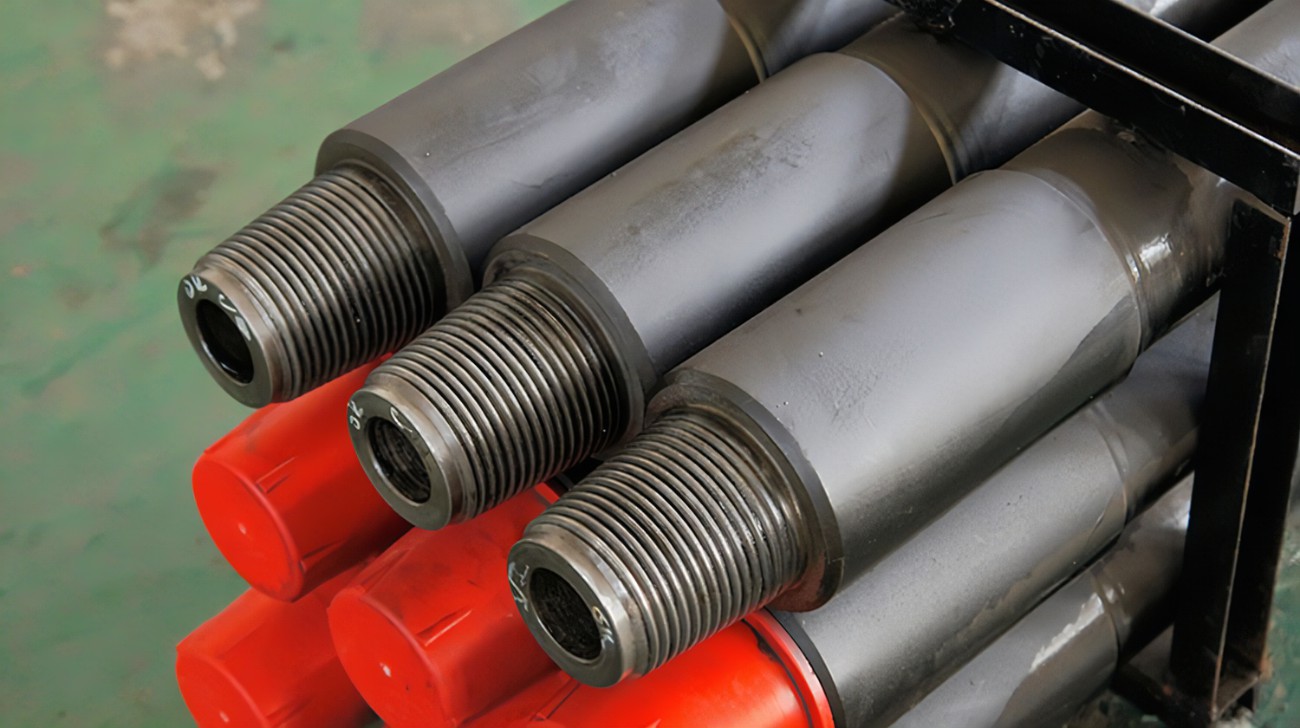
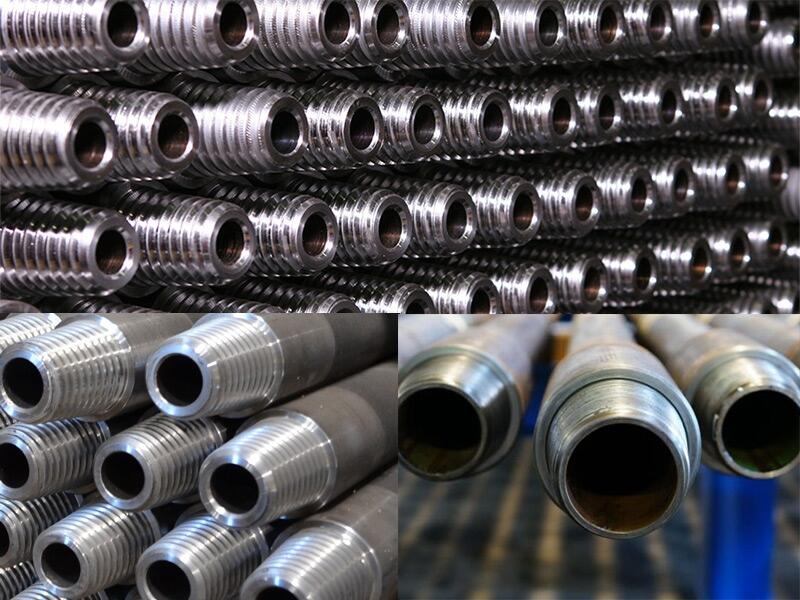
Each end of the pipe incorporates a tool joint, and is differentiated by the male threaded connection referred to as the "pin" and the female threaded connection which is referred to as the "box". They are pre-fabricated and welded onto the pipe. The tool joints provide high-strength, threaded connections. They are heat treated to a higher strength than the steel of the tube body in order to survive the rigors of drilling and numerous cycles of tightening and loosening of threads. Tool joints are specified by upset and thread type.
Upset
The upset (thread-end finish) refers to the wall of the tool joint at the threaded connection. Drill pipe is offered with an internal upset (IU), an external upset (EU), or an internal-external upset (IEU).
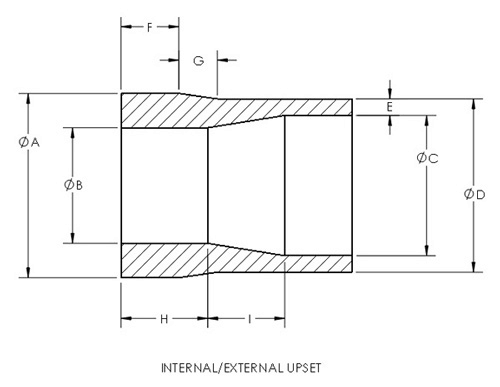
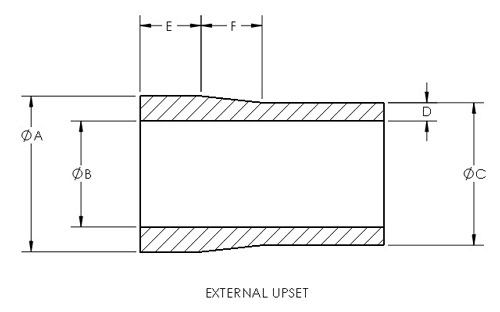
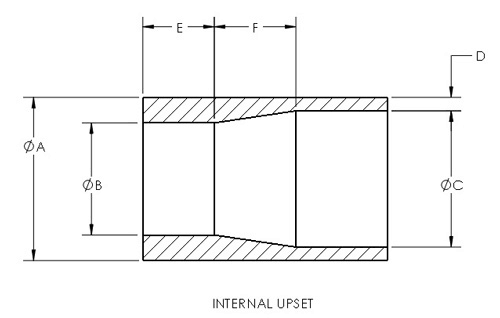
IU - In an internal upset increased thickness along the inside walls compensate for the metal removed in threading with a uniform, straight outside wall.
EU - In an external upset the increased thickness along the outside diameter of the tubing compensates for the metal removed in threading with a straight bore.
IEU - In an internal-external upset thickness is increased along both the inside and outside walls of the pipe to compensate for the metal removed in threading.
Threaded Connection
Tool joints incorporate threaded connections. They include standard API threads as well as proprietary threads. Each type of threaded connection is specified by threads per inch (TPI) and it's taper. Common API tool joints include regular (REG), full-hole (FH), and internal-flush (IF).
Features
. Non-magnetic drill pipe is used to isolate measurement while drilling (MWD) and logging while drilling (LWD) tools from the drill string. This minimizes associated electromagnetic interference and increases the accuracy of the directional surveys.
Hardbanding is incorporated on the tool joints and center wear pad of the drill pipe in order to increase the abrasion resistance.
. Spiral grooves on the external surface of the drill pipe reduce differential sticking and improve flow characteristics of the drilling mud.
Standards
API RP 5A5 - This International Standard specifies requirements and gives recommendations for field inspection and testing of oil country tubular goods (OCTG). This International Standard covers the practices and technology commonly used in field inspection; however, certain practices may also be suitable for mill inspections.
| Drill Pipe Specifications | ||||||||||
| Pipe | Tool Joint | |||||||||
| Size OD, | Nominal Weight, | Upset Type | Grade | Wall Thickness, | ID, | Connection Type | OD, | ID, | Pin Tong Space*, | Box Tong Space*, |
| in. | lb/ft | in. | in. | in. | in. | in. | in. | |||
| 2 3/8 | 6.65 | EU | E-75 | 0.28 | 1.815 | NC26 | 3 3/8 | 1 3/4 | 9 | 10 |
| X-95 | 0.28 | 1.815 | NC26 | 3 3/8 | 1 3/4 | 9 | 10 | |||
| G-105 | 0.28 | 1.815 | NC26 | 3 3/8 | 1 3/4 | 9 | 10 | |||
| S-135 | 0.28 | 1.815 | NC26 | 3 5/8 | 1 3/4 | 9 | 10 | |||
| 2 7/8 | 10.4 | EU | E-75 | 0.362 | 2.151 | NC31 | 4 1/8 | 2 1/8 | 9 | 11 |
| X-95 | 0.362 | 2.151 | NC31 | 4 1/8 | 2 | 9 | 11 | |||
| G-105 | 0.362 | 2.151 | NC31 | 4 1/8 | 2 | 9 | 11 | |||
| S-135 | 0.362 | 2.151 | NC31 | 4 3/8 | 1 5/8 | 9 | 11 | |||
| 3 1/2 | 13.3 | EU | E-75 | 0.368 | 2.764 | NC38 | 4 3/4 | 2 11/16 | 10 | 12 1/2 |
| X-95 | 0.368 | 2.764 | NC38 | 5 | 2 9/16 | 10 | 12 1/2 | |||
| G-105 | 0.368 | 2.764 | NC38 | 5 | 2 7/16 | 10 | 12 1/2 | |||
| S-135 | 0.368 | 2.764 | NC38 | 5 | 2 1/8 | 10 | 12 1/2 | |||
| 15.5 | EU | E-75 | 0.449 | 2.602 | NC38 | 5 | 2 9/16 | 10 | 12 1/2 | |
| X-95 | 0.449 | 2.602 | NC38 | 5 | 2 7/16 | 10 | 12 1/2 | |||
| G-105 | 0.449 | 2.602 | NC38 | 5 | 2 1/8 | 10 | 12 1/2 | |||
| S-135 | 0.449 | 2.602 | NC40 | 5 1/2 | 2 1/4 | 9 | 12 | |||
| 4 | 14 | IU | E-75 | 0.33 | 3.34 | NC40 | 5 1/4 | 2-13/16 | 9 | 12 |
| X-95 | 0.33 | 3.34 | NC40 | 5 1/4 | 2 11/16 | 9 | 12 | |||
| G-105 | 0.33 | 3.34 | NC40 | 5 1/2 | 2 7/16 | 9 | 12 | |||
| S-135 | 0.33 | 3.34 | NC40 | 5 1/2 | 2 7/16 | 9 | 12 | |||
| EU | E-75 | 0.33 | 3.34 | NC46 | 6 | 3 1/4 | 9 | 12 | ||
| X-95 | 0.33 | 3.34 | NC46 | 6 | 3 1/4 | 9 | 12 | |||
| G-105 | 0.33 | 3.34 | NC46 | 6 | 3 1/4 | 9 | 12 | |||
| S-135 | 0.33 | 3.34 | NC46 | 6 | 3 | 9 | 12 | |||
| 15.7 | IU | E-75 | 0.38 | 3.24 | NC40 | 5 1/4 | 2 11/16 | 9 | 12 | |
| X-95 | 0.38 | 3.24 | NC40 | 5 1/4 | 2 7/16 | 9 | 12 | |||
| G-105 | 0.38 | 3.24 | NC40 | 5 1/2 | 2 7/16 | 9 | 12 | |||
| S-135 | 0.38 | 3.24 | NC40 | 5 1/2 | 2 | 9 | 12 | |||
| EU | E-75 | 0.38 | 3.24 | NC46 | 6 | 3 1/4 | 9 | 12 | ||
| X-95 | 0.38 | 3.24 | NC46 | 6 | 3 1/4 | 9 | 12 | |||
| G-105 | 0.38 | 3.24 | NC46 | 6 | 3 1/4 | 9 | 12 | |||
| S-135 | 0.38 | 3.24 | NC46 | 6 | 3 | 9 | 12 | |||
| 4 1/2 | 16.6 | IEU | E-75 | 0.337 | 3.826 | NC46 | 6 1/4 | 3 | 9 | 12 |
| X-95 | 0.337 | 3.826 | NC46 | 6 1/4 | 3 1/4 | 9 | 12 | |||
| G-105 | 0.337 | 3.826 | NC46 | 6 1/4 | 3 | 9 | 12 | |||
| S-135 | 0.337 | 3.826 | NC46 | 6 1/4 | 2 3/4 | 9 | 12 | |||
| EU | E-75 | 0.337 | 3.826 | NC50 | 6 5/8 | 3 3/4 | 9 | 12 | ||
| X-95 | 0.337 | 3.826 | NC50 | 6 5/8 | 3 3/4 | 9 | 12 | |||
| G-105 | 0.337 | 3.826 | NC50 | 6 5/8 | 3 3/4 | 9 | 12 | |||
| S-135 | 0.337 | 3.826 | NC50 | 6 5/8 | 3 1/2 | 9 | 12 | |||
| 20 | IEU | E-75 | 0.43 | 3.64 | NC46 | 6 1/4 | 3 | 9 | 12 | |
| X-95 | 0.43 | 3.64 | NC46 | 6 1/4 | 2 3/4 | 9 | 12 | |||
| G-105 | 0.43 | 3.64 | NC46 | 6 1/4 | 2 1/2 | 9 | 12 | |||
| S-135 | 0.43 | 3.64 | NC46 | 6 1/4 | 2 1/4 | 9 | 12 | |||
| EU | E-75 | 0.43 | 3.64 | NC50 | 6 5/8 | 3 5/8 | 9 | 12 | ||
| X-95 | 0.43 | 3.64 | NC50 | 6 5/8 | 3 1/2 | 9 | 12 | |||
| G-105 | 0.43 | 3.64 | NC50 | 6 5/8 | 3 1/2 | 9 | 12 | |||
| S-135 | 0.43 | 3.64 | NC50 | 6 5/8 | 3 | 9 | 12 | |||
| 5 | 19.5 | IEU | E-75 | 0.362 | 4.276 | NC50 | 6 5/8 | 3 3/4 | 9 | 12 |
| X-95 | 0.362 | 4.276 | NC50 | 6 5/8 | 3 1/2 | 9 | 12 | |||
| G-105 | 0.362 | 4.276 | NC50 | 6 5/8 | 3 1/4 | 9 | 12 | |||
| S-135 | 0.362 | 4.276 | NC50 | 6 5/8 | 2 3/4 | 9 | 12 | |||
| E-75 | 0.362 | 4.276 | 5-1/2 FH | 7 | 3 3/4 | 10 | 12 | |||
| X-95 | 0.362 | 4.276 | 5-1/2 FH | 7 | 3 3/4 | 10 | 12 | |||
| G-105 | 0.362 | 4.276 | 5-1/2 FH | 7 | 3 3/4 | 10 | 12 | |||
| S-135 | 0.362 | 4.276 | 5-1/2 FH | 7 1/4 | 3 1/2 | 10 | 12 | |||
| 25.6 | IEU | E-75 | 0.5 | 4 | NC50 | 6 5/8 | 3 1/2 | 9 | 12 | |
| X-95 | 0.5 | 4 | NC50 | 6 5/8 | 3 | 9 | 12 | |||
| G-105 | 0.5 | 4 | NC50 | 6 5/8 | 2 3/4 | 9 | 12 | |||
| S-135 | 0.5 | 4 | NC50 | 6 5/8 | 2 3/4 | 9 | 12 | |||
| E-75 | 0.5 | 4 | 5-1/2 FH | 7 | 3 1/2 | 10 | 12 | |||
| X-95 | 0.5 | 4 | 5-1/2 FH | 7 | 3 1/2 | 10 | 12 | |||
| G-105 | 0.5 | 4 | 5-1/2 FH | 7 1/4 | 3 1/2 | 10 | 12 | |||
| S-135 | 0.5 | 4 | 5-1/2 FH | 7 1/4 | 3 1/4 | 10 | 12 | |||
| 5 1/2 | 21.9 | IEU | E-75 | 0.361 | 4.778 | 5-1/2 FH | 7 | 4 | 10 | 12 |
| X-95 | 0.361 | 4.778 | 5-1/2 FH | 7 | 3 3/4 | 10 | 12 | |||
| G-105 | 0.361 | 4.778 | 5-1/2 FH | 7 1/4 | 3 1/2 | 10 | 12 | |||
| S-135 | 0.361 | 4.778 | 5-1/2 FH | 7 1/2 | 3 | 10 | 12 | |||
| 24.7 | IEU | E-75 | 0.415 | 4.67 | 5-1/2 FH | 7 | 4 | 10 | 12 | |
| X-95 | 0.415 | 4.67 | 5-1/2 FH | 7 1/4 | 3 1/2 | 10 | 12 | |||
| G-105 | 0.415 | 4.67 | 5-1/2 FH | 7 1/4 | 3 1/2 | 10 | 12 | |||
| S-135 | 0.415 | 4.67 | 5-1/2 FH | 7 1/2 | 3 | 10 | 12 | |||
| 6 5/8 | 25.2 | IEU | E-75 | 0.33 | 5.965 | 6-5/8 FH | 8 | 5 | 10 | 13 |
| X-95 | 0.33 | 5.965 | 6-5/8 FH | 8 | 5 | 10 | 13 | |||
| G-105 | 0.33 | 5.965 | 6-5/8 FH | 8 1/4 | 4 3/4 | 10 | 13 | |||
| S-135 | 0.33 | 5.965 | 6-5/8 FH | 8 1/2 | 4 1/4 | 10 | 13 | |||
| 27.7 | IEU | E-75 | 0.362 | 5.901 | 6-5/8 FH | 8 | 5 | 10 | 13 | |
| X-95 | 0.362 | 5.901 | 6-5/8 FH | 8 1/4 | 4 3/4 | 10 | 13 | |||
| G-105 | 0.362 | 5.901 | 6-5/8 FH | 8 1/4 | 4 3/4 | 10 | 13 | |||
| S-135 | 0.362 | 5.901 | 6-5/8 FH | 8 1/2 | 4 1/4 | 10 | 13 | |||
| *2" longer than standard. | ||||||||||
Best regards,
Phiger Leo
Direct Line: 0086-137-6419 5009
WeChat/WhatsApp:: +86-137-6419 5009
================================================================
ROSCHEN@ INC.
ROSCHEN@ GROUP LIMITED
ROBERT ROSCHEN@ LIMITED
ROSCHEN@ HOLDINGS LIMITED
HEFEI ROSCHEN@ TOOL CO., LTD.
ROSCHEN@ GEOLOGICAL TOOL CO.,LTD.
SHANGHAI ROSCHEN@ INTERNATIONAL CO., LTD.
ROSCHEN@ GEOLOGICAL INSTRUMENTS CO., LTD.
EMAIL: roschen@roschen.com ; roschen@roschen.net
Website: http://www.roschendrill.com
http://www.roschenmining.com
http://www.roschendrilling.com
http://www.explorationcoredrilling.com
http://www.roschen.net
http://www.roschen.cn
http://www.roschen.com
================================================================


